The Problem
Sharing reusable workflows while safeguarding sensitive data poses security challenges, hindering collaboration and workflow efficiency.
- You have some quality checks to perform that calls internal APIs
- To access those APIs you would not like to store secrets across the whole organization.
- Your workflow should be reusable by any team before promotion or deployment
What doesn’t work
Providing an SSH key to checkout a private repository still requires storing that key somewhere. You might wonder: What if an internal workflow / action can call a private workflow / action… But that doesn’t work. Private workflows and actions can only be reused from another private repository. Even if the private repos SSH key is stored in the internal repo, secrets can’t be transferred across repositories, only inherited (secrets: inherit)
Solution
Hashicorp Vault and OIDC connect
Vault is a key store that helps you secure, store, and tightly control access to tokens, passwords, certificates, and encryption keys for protecting secrets and other sensitive data using a UI, CLI, or HTTP API.
How do you configure Vault so that only your github workflow is authorized and authenticated to access secrets ?
In 2021, GitHub unveiled composite actions and reusable workflows alongside enhanced OIDC hardening support. This implementation allowed GitHub runners to support OIDC, enabling external applications to authenticate tokens generated by GitHub.
This process involves the generation of an identity token (#1) specific to the job running on the runner. This token is then exchanged with a third-party application. Pre-configured with GitHub’s OIDC information, the third-party application queries an endpoint on GitHub, retrieving crucial information such as keys and issuer (#3). This information is subsequently utilized to authenticate that the identity token originates from GitHub.
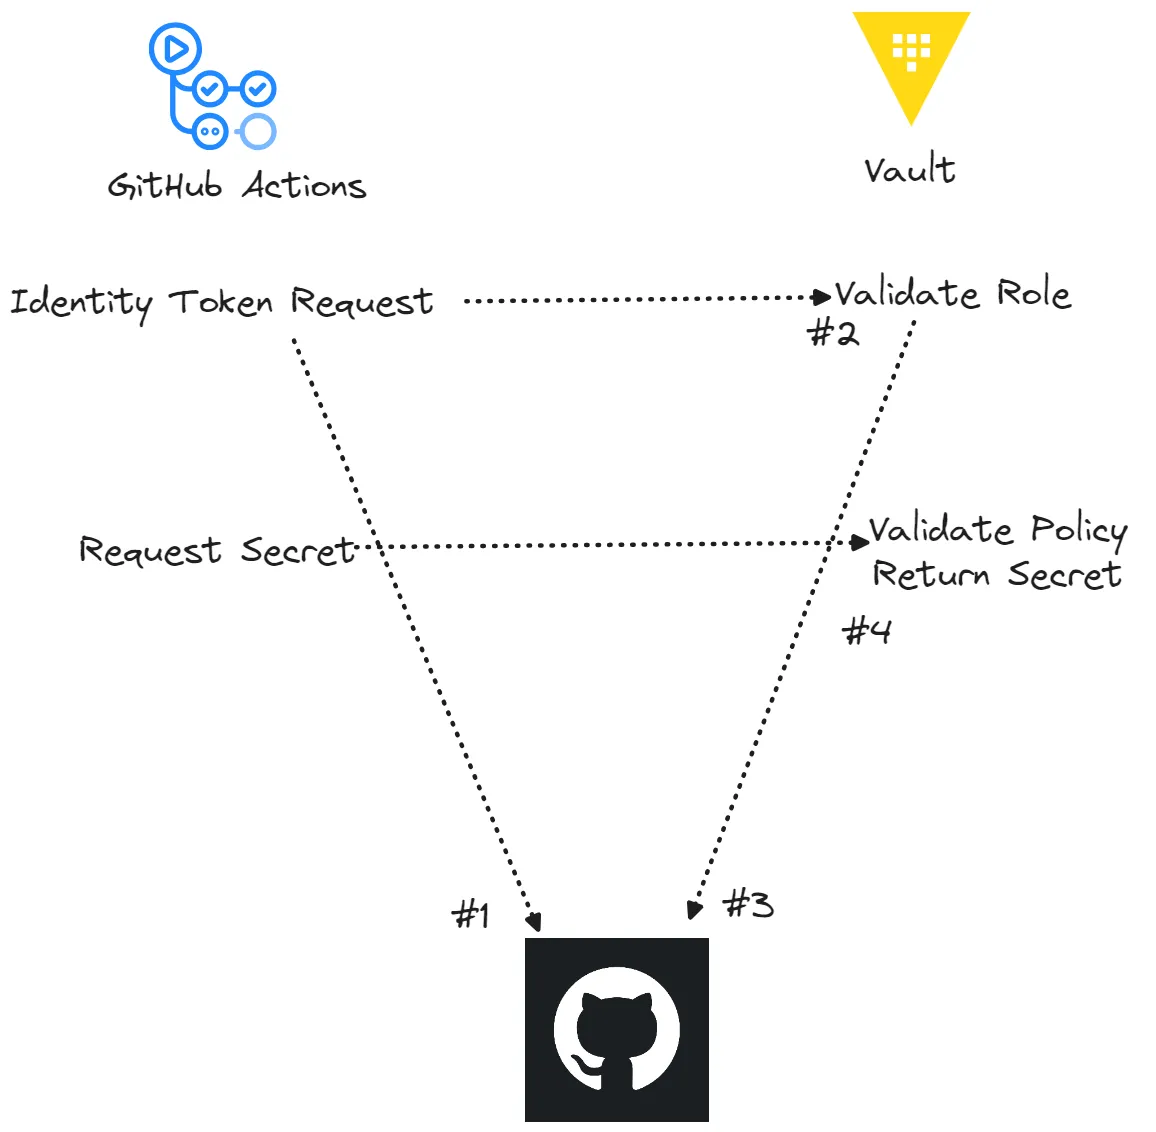
The application now possesses both the information obtained from GitHub and the token from the agent. It proceeds to validate the token, and upon successful validation, inspects its contents. Subsequently, the token is used to authenticate against a specified role or identity within the application. Upon successful authentication, the user is granted authorization rights corresponding to that role or identity (#2).
As a result, the workflow gains access to the secrets available to it under the policy assigned to the authenticated role.
Vault JWT Authentication
Vault supports various authentication methods, including JWT. With JWT, you can utilize a token issued by a third party to authenticate with Vault as a specific role identity. Each role can be associated with one or more Vault policies.
Simply possessing a token and knowing the role name doesn’t guarantee successful authentication. Roles may have security requirements that must be satisfied for the access token to be granted. It’s recommended to configure additional assertions in Vault to validate that the token originates from our workflow and is from a trusted source.
Attached is an example of the JWT that will be posted by the GitHub runner:
{
  "typ": "JWT",
  "alg": "RS256",
  "x5t": "example-thumbprint",
  "kid": "example-key-id"
}
{
  "jti": "example-id",
  "sub": "repo:octo-org/octo-repo:environment:prod",
  "environment": "prod",
  "aud": "https://github.com/octo-org",
  "ref": "refs/heads/main",
  "sha": "example-sha",
  "repository": "octo-org/octo-repo",
  "repository_owner": "octo-org",
  "actor_id": "12",
  "repository_visibility": "internal",
  "repository_id": "74",
  "repository_owner_id": "65",
  "run_id": "example-run-id",
  "run_number": "10",
  "run_attempt": "2",
  "runner_environment": "github-hosted",
  "actor": "octocat",
  "workflow": "example-workflow",
  "head_ref": "",
  "base_ref": "",
  "event_name": "workflow_dispatch",
  "ref_type": "branch",
  "job_workflow_ref": "octo-org/octo-automation/.github/workflows/oidc.yml@refs/heads/main",
  "iss": "https://token.actions.githubusercontent.com",
  "nbf": 1632492967,
  "exp": 1632493867,
  "iat": 1632493567
}
Vault Setup
Download and install Vault
mkdir vault && cd vault
Create a vault-config.hcl file:
listener "tcp" {
    address = "0.0.0.0:8200"
    # No TLS Certificate Generated
    tls_disable = true
}

# Database storage
storage "raft" {
    path = "./vault/data"
    node_id="node1"
}

# Prevent memory from being swapped to disk. Disable mclock in production
disable_mclock = true

api_addr = "http://localhost:8200"
cluster_addr = "http://127.0.0.1:8201"
ui = true
The backend storage used here is raft which is a filesystem storage. You can use consul if needed. Create a data directory inside vault and create a file vault.db. Vault is not a sudo user here
mkdir data && cd data && touch vault.db
Decide if you want to segment your secrets by spaces. This is useful if there are different departments using this Vault and they require some autonomy. Each company is different so evaluate your side and decide appropriately.
But lets say you do want one, then we’d run the below command on the vault host.
vault namespace create cicd
Start the Vault server using the following command:
vault server -config=./vault-config.hcl
Initialization and Unsealing
-
export VAULT_ADDR=http://127.0.0.1:8200 -
Initialize the Vault server by running the following command:
vault operator init -key-shares=1 -key-threshold=1This will generate one unseal key and an initial root token. Make sure to securely store these credentials. The unseal key is used to decrypt the data stored in vault server
Example ( initialized with 5 keys )
Unseal Key 1: T+ZCMtcZs27bfW2JKOP7vPENDv7aSYPN0KcH3qjZR9S2 Unseal Key 2: sPB7kaxeLl9Dog9Hi2iRji7a8mVfc98HIYKTAxjFLpQc Unseal Key 3: y6qb+EREJ+JzW/15KoP1uH2StZaaArjcMWISjvU2R3rq Unseal Key 4: l4P+D0QDEVfMAbCZMQs1/MQczBNst6CzRT3I3ULhKEVN Unseal Key 5: IJQ84A2e16wfOHOh1veGjXNJgvDivx7BGoC00VhIIep4 Initial Root Token: hvs.Vib5lJowTIn4p9MbNwsIipMr Vault initialized with 5 key shares and a key threshold of 3. Please securely distribute the key shares printed above. When the Vault is re-sealed, restarted, or stopped, you must supply at least 3 of these keys to unseal it before it can start servicing requests. Vault does not store the generated root key. Without at least 3 keys to reconstruct the root key, Vault will remain permanently sealed! It is possible to generate new unseal keys, provided you have a quorum of existing unseal keys shares. See "vault operator rekey" for more information. -
Unseal the Vault server using the unseal keys generated in the previous step. Run the following command for each unseal key:
vault operator unseal <unseal_key>Replace
<unseal_key>with the actual unseal key. -
Log in to the Vault server using the initial root token:
vault login <root_token>Replace
<root_token>with the initial root token.
Enable Audit Logging
mkdir logs
vault audit enable file file_path=./logs/vault_audit.log
Configuration
To set up vault server with the right policy and authorization:
-
Create a
kvsecret engine in vault UI by logging(http://127.0.0.1:8200/ui) in with the generated unseal token and root token. Name the kv engine<your_secret_engine/namespace>vault secrets enable -path=secret kv -
Create a path for the secret:
<your_secret>Create a secret with key:<SECRET_KEY>. Add the secret key as valuevault kv put secret/apikeys deploymentServer=<SUPER_SECRET> -
Create an access policy that will be applied to identities. These policies will grant the identities permissions over the engines you have installed in your namespace. Grant
read-onlycapabilities for the policy and the secret pathvault policy write quality-check-policy - << EOF path "secret/data/apikeys" { capabilities = ["read"] } EOF -
Enable JWT authentication
vault auth enable jwtThis will now call back to a well known endpoint on the above url and collect some key information which will be used to validate the signature of the identity token that came in. Allowing Vault to verify the token came from the origin configured for this authentication.
Enter a policy for the endpoint:
vault write auth/jwt/config / oidc_discovery_url="https://github.<enterprise_domain>.com/_services/token" / bound_issuer="https://github.<enterprise_domain>.com/_services/token" -
Create a JSON file
jwt_role_config.jsonto create a role that has a series of assertion requirements on it. And if the identity token meets the assertions of the role, it is given the policies assigned to it. This is how its defined{ "name": "<your_role>", "role_type": "jwt", "user_claim": "repository", "bound_audiences": [ "https://github.<enterprise_domain>.com/<org>" ], "bound_claims_type": "string", "bound_claims": { "job_workflow_ref": ["<OWNER>/<REPO>/.github/workflows/<WORKFLOW_FILE>.yaml@refs/heads/<ref>"] }, "ttl": "100", "token_policies": ["quality-check-policy"] }Add the list of authorized workflows to
"job_workflow_ref". Lets look at each of those:name— the name of the role, simple. This is used in combination with the identity token to validate as a identityrole_type— describes type of validation process to occuruser_claim— the bare minimum we need to run the assertionsbound_audiences— alternative audience to match on outside of the default being the client id. I recommend this being something unique to represent the value the authorizing party providesbound_claims— this is the claim to do a match against. It’s an object that contains the claims as they would be on the identity token.bound_claims_type— this is the type of comparison validator to run on the bound_claims and the identity token.token_policies— contains the policies assigned to this role
Write your
JSONconfigurationvault write auth/jwt/role/qm-action-role @config.jsonFor more information on bound claims refer here
-
To check the policies for
<your_role>vault read auth/jwt/role/<your_role>
Github Workflow
Set up your authorized workflow to access secrets from vault
name: Quality Checks

on:
    workflow_call:
        inputs: ...
        outputs: ...

jobs:
    QUALITY_CHECK:
        # <------ Permissions to generate OIDC token ------>
       permissions:
          id-token: write
          contents: read
Retrieve keys from vault:
# <-----  USING VAULT ACTION  ----->
- name: Retreive Secrets From Vault
  id: retrieve-secret-from-vault
  uses: hashicorp/vault-action@v2.7.4
  with:
    method: jwt
    url: <url_of_vault_server>
    role: <your_role>
    jwtGithubAudience: "https://github.<enterprise_domain>.com/<org>"
    tlsSkipVerify: true # If TLS is disabled in your vault server
    exportEnv: true
    secrets: |
      # Exporting to an environment variable
      <your_secret_engine>/data/apikeys/ <your_secret> | YOUR_SECRET;
      ... other secrets

# <-----  CLEAN UP  ----->
- name: Clean up
  run: |
    echo "YOUR_SECRET=" >> $GITHUB_ENV
    ...
  shell: bash